Organizing and storing leftover garden seeds, no matter if you save homegrown seed or leftover quality seeds, means ease of access for taking seed inventory as well as ensuring viable germination come planting time.
This post may contain affiliate links at no additional cost to you. By making your purchases through the links on this website, IMSL may make a small percentage at no direct cost to you. IMSL only promotes products we use & truly believe in. Please refer to my Privacy & Disclosures for further information. IMSL thanks you for your support!
Creating a useable, organized system for storage of leftover seeds that doesn’t cost an arm & a leg, one that will sustain the rough abuse each planting season is easier than you may think.
It was long overdue. Getting my stored seeds out and organizing them. See what’s on hand, what’s expired, what needs ordering, and giving the system a good go through. After all, when planting time begins, who has the time to search for what you want to plant only to find out they may not be viable or any left in the envelope at all!
BENEFITS OF ORGANIZING YOUR GARDEN SEEDS
You may be wondering, “why take the time to organize your seeds when you will be going through them at planting time”. Well, many reasons.
First and in my eyes most importantly, by going through your existing seed you will know exactly what you have on hand. In the long run, this will save you $$$! There have been many a time that another seed packet was ordered or purchased and come to find out, we had 1 or 2 already on hand.
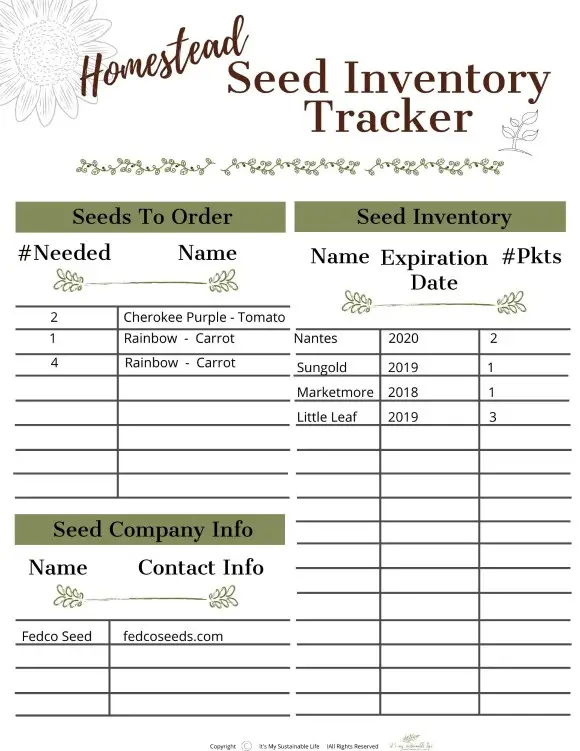
- Inventory – By taking seed inventory, you will know exactly what you have on hand and what you need to order
- Garden Seed Tracker – Be sure to grab your copy of our beautiful FREE “Seed Inventory Tracker”. A free printable that is part of our Organizing The Homestead Series. This organizational tool will help you (and me) streamline the process of taking inventory year-to-year 🙂
- Use Old First – By organizing & sorting your seeds (band together oldest to newest), you will be sure to use the oldest seed first
IMSL’s COMPLETE GARDEN PLANNER
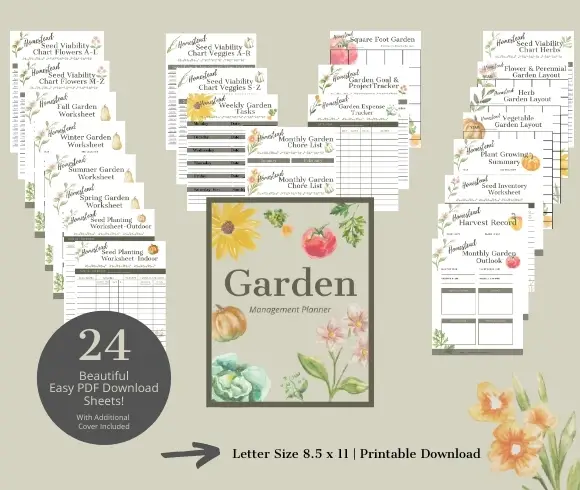
Looking for a more in-depth tracking, planning, and inventory garden management planner? Take a look at IMSL’s Garden Management Planner in our Etsy shop!
These 24 clear and concise printable pages, with the addition of a gorgeous cover sheet, were created with the gardener in mind. Simple to use & adjust to your specific needs, each page will assist you in designing, planning, harvesting, and maintaining your garden.
These pages can be printed yearly & customized to suit your own garden management needs. Creating a yearly journal of my garden from day one may be the best thing I’ve done here on the hill 😊
ORGANIZE SEED PACKETS
My seed storage system was a mess. Literally. I don’t think I had gone through it in let’s say a few years. It was long overdue, not only organizing the seed packets but also giving it a good cleaning!
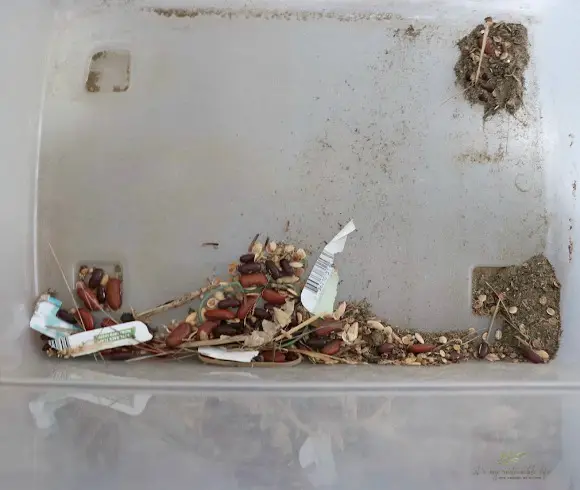
With the cleaning finished and the container dried thoroughly, time to go through the seeds. First, by removing all the packets from my storage container, they needed a good sorting. The packets were banded in no particular order. Although they were placed in generalized planting order, early, mid, late, and a separate sections for flowers & herbs (more on why below), they needed a good going through.
Culling the expired & out-dated seeds (how long you can keep seed packets is covered below as well) were first on the list. Don’t throw the old seed away! You can do several things with expired seed…broadcast them in an area that you are not growing anything presently and see what you can get from them, feed them to your chickens if you keep them, or feed them to nature, something will find them and have a feast 🙂
Once the old is removed, you can then band together like packets with rubber bands (oldest to newest). After all, any gardener will not just have one variety of seed for say tomatoes. We enjoy a variety and have many a variety available.
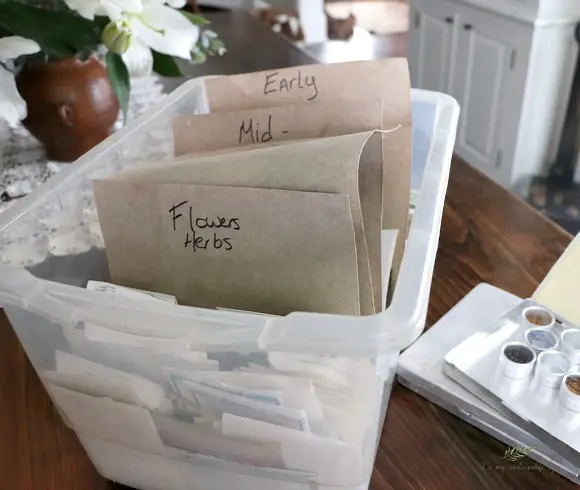
The dividers that were used for years were not working so well any longer…a bit too floppy if you will, & quite frankly, a pain in the hiney to work with. Easily fixed by cutting out new dividers from strong cardboard to separate the banded seed packets (shown below) and labeling.
DIY SEED ORGANIZER (THAT WON’T BREAK THE BANK)
I’ve seen some amazing seed storage options out there. Everything from expensive photo storage cases (keeps them beautiful but are they easy to access?) to simple recycled cardboard boxes. Although these more expensive options are useable, I don’t know about you but I don’t really want to spend between $25 to $49 for a storage case for garden seeds and then have to fuss with removing them from their cases while trying to direct seed. Or having the box get damp while using it in the garden! Not so good for your stored seeds.
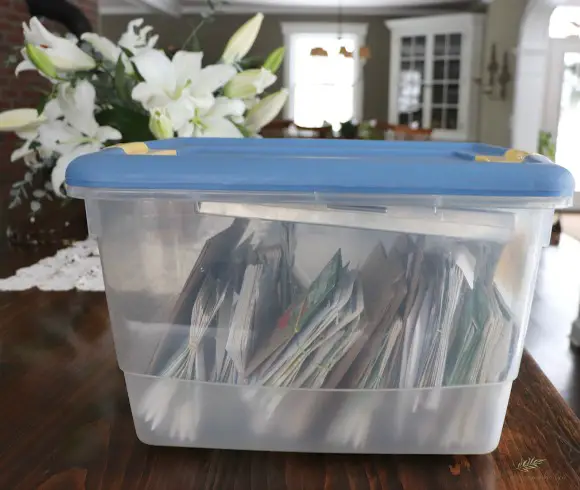
Our solution? A re-purposed plastic container with cover. We have used the same plastic container (18 1/2 Qt sized) for the last 15+ years here to store our seed packets. It was a container not being used for storage any longer and cost us nothing additional.
By storing them in their original packet (keeps all the vital information available), it keeps them dry & covered, organized (when I keep them that way) and easily available when planting or direct seeding in the garden. AND you may have one already lying around or can easily purchase one very reasonably in any box store.
When saving seeds, many moons ago I found the metal container with individual round containers that work perfectly for storing my seeds saved from the garden. Although I was not able to find the exact containers we use here, lip balm or cosmetic containers would work well.
Some things to consider when choosing your storage method…
- Money – Determine your budget. As stated it can get pricey for certain options and free for others.
- Accessibility – When you are in the garden planting and elbows deep in soil, do you really want to rummage around for the needed seed? Be sure whatever container you choose, it can be carried to the garden and the packets are easily accessible.
- Air Tight – Be sure the container you choose is as air-tight as possible (our preferred method) for long-term storage of your seeds. Many feel keeping the seed in the original packet is sufficient.
SEED STORING CONTAINER IDEAS
Keeping the above in mind when selecting your seed storage containers, the options are many. Here are just a few.
- Mason Jars – Mason jars make the perfect storage for saving seeds. Make sure you have a lid that secures well & use a sharpie pen to label the jar itself with the variety and date
- Catalog Style – Using cut out cardboard to separate either by variety or by season & using any one of the listed containers
- Up-cycled Jars – Same as using mason jars only you are saving a bit of waste that would otherwise go into the landfill
- Photo Album – Many like to store seed packets in photo albums. They store wonderfully and well organized, but easily accessible? I think not
- Photo Storage Cases – As mentioned above, these can be pricey and not as easily accessible as we like when in the midst of seeding in
- Gathering Baskets – These make a wonderful storage container if you have a nice dry space to store it in. The handle makes for great mobility when taking it directly into the garden
HOW TO STORE PACKETS OF GARDEN SEEDS
Now that you have your container picked out, it’s clean and dried well, how exactly should you set it up? You’ve heard me mention several times throughout about “easy accessibility”. What exactly do I mean by that?
When I’m in the midst of planting and sowing in seed, the last thing I want to have to do is stop and hunt for a seed packet. This means having my seed packets in an easy to access container as well as organized by banding together like varieties.
The plastic container used is all of that & more. I can easily transport, keep it covered while in the garden (at least try to minimize the dirt and soil that always finds its way into the case), and have them ready at hand when needed.
TIP: As seeds should be kept & stored in as dry an area as possible, re-purpose those small silica packets that come in bottled supplements and so forth and add a few in the bottom of your container to keep moisture at a minimum.
HOW TO CATEGORIZE SEEDS IN YOUR CONTAINER
Simple is best. Rubberband together like varieties, tomatoes, cucumbers, squash, and so on (oldest to newest as stated). You will find that most will label their container dividers with the varieties of seed, tomatoes, cukes etc. The preferred way to categorize our seeds here on the hill is by “season” for lack of a better term.
As most growing “seasons” are summer or the warmest months of the year, we find it easier to separate our banded seeds by labeling which part of the season they need to be either started or direct-seeded.
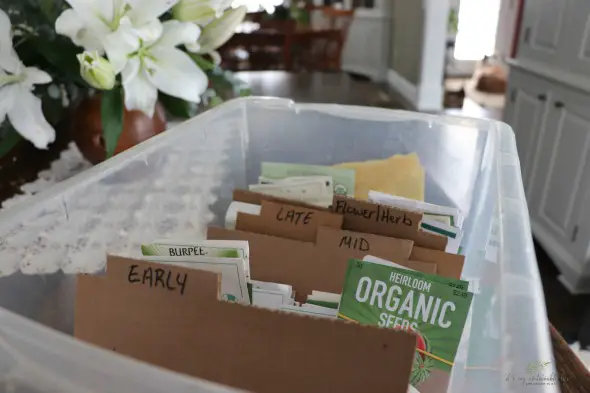
Using strong cardboard, we simply cut out to fit the container, separators that we labeled early, mid, & late season for our vegetable seed packets as well as a separate area for strictly flowers & herbs that need to be started from seed early in the year.
WHAT IS THE BEST WAY TO STORE SEEDS FOR NEXT YEAR
Right in the packet, they come in. Seed packet jackets are the best way to keep those seeds when purchasing them. The jacket keeps them dry & dark and holds all the information you need for planting.
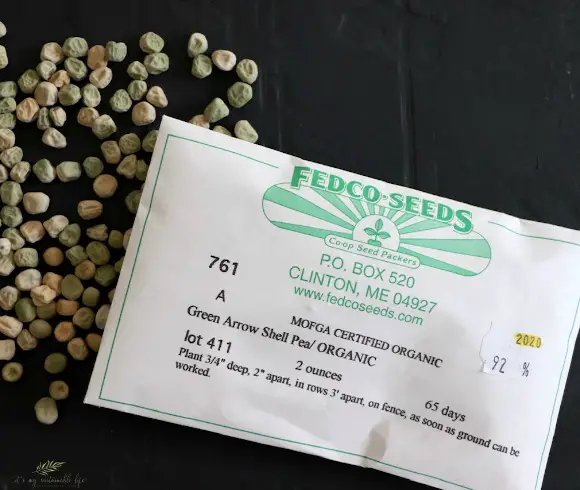
As shown above, the jacket displays the variety name, the year the seeds germination was tested (2020), the percentage of successful germination (92%), days to germination (65 days), and sowing instructions all in one place. No need to check back with the catalog or sowing charts. Everything you need is right there!
HOW LONG IS TOO LONG TO KEEP GARDEN SEED PACKETS
It depends on the variety. Onion seed is said to have only 1 year viability as opposed to celery seed that has 5 years. We have found that seeds last longer than claimed, normally.
Important to note, the longer the seed is stored for, typically, the greater the reduction of the germination rate. When using expired or out-dated seed, we always plant double as the germination rate is affected.
High Mowing Organic Seed has a wonderful viability chart that one can easily refer to listing the main varieties that most will plant in their gardens. Again, this is an estimate of seed longevity.
Sharing Is Caring & I Thank You For It ❤️
GETTING YOUR SEEDS OUT IN SPRING – SEED VIABILITY TEST
When storing your seeds long-term it’s always best to give them a seed viability test prior to planting in the ground. There is nothing worse than going through all the work of seeding in and getting a bunch of, well, nothing. Duds. No germination.
Viability testing is an easy and quick way to make sure you keep those duds at bay and have success in the garden. To test for viability, gather the following:
- Seeds – Gather your old seeds that need testing
- Paper Towel – 1-2 sheets will do for each test
- Resealable Plastic Baggie – Create a mini-greenhouse for each seed variety
- Sharpie – Marking is always advised when testing multiple seeds
Dampen the paper towel. Not dripping, just dampened so it’s well moistened and a bit soggy.
Place 10 seeds on the wet paper towel. This allows for a nice random testing of the seed and determining the success rate easily (percentage). Lay a second wet paper towel over the top of the seeds.
Mark your plastic baggie with the variety name.
Place the seeds in the paper towels into the plastic baggie that has been labeled and set aside in a warm area. Depending of the variety of seed, sprouting can take anywhere from 2-14 days. The longer the sprouting time be sure to keep the paper towels moistened by spritzing with water if necessary.
Once the seed has sprouted, determine your percentage of success.
- 1 seed = 10% germination success
- 5 seeds = 50% germination success
- 10 seeds = 100% germination success
Look for at least a 50% germination success for good viability. Anything under 50% and your rate of success in the garden is well…full of duds 🙂
With a little organization & time, you will have wonderfully stored leftover garden seeds at your fingertips & ready to go come springtime. Do you have a preferred method for organizing & storing leftover garden seeds long-term? Join the conversation below & tell us about it!
Love, Light, & Laughter ~

Enjoy this article? Please consider sharing it on your favorite social media channel! Want more? Subscribe below for the occasional update with all the “happenings on the hill”!


48 comments
As usual, great suggestions! I love how organized you are.
Aah – yes! I love organization and these are some great tips. Sadly, I don’t garden (wish I did, though).
Thank you for sharing at #OverTheMoon. Pinned and shared. Have a lovely week. I hope to see you at next week’s party too!
I wish I could have a garden these is really neat. You have a lot of great ideas.
Thank you, Jody! Could you grow on a small scale in pots?
Wow, your organization is incredible!
Organization is definitely the key! I can imagine that you could easily forget what you have and what you need to get if you weren’t organized!
Great ideas. As a new, aspiring gardener, I’m now appreciating how organization plays a huge role in the planting phase….Timely as well.
I’m glad you found this of use Vaness! Happy gardening 🙂
Great ideas for storing seeds!
I’ve got some old seeds there I wasn’t sure what to do with. Thanks for sharing.
Love this! My husband and mom both love to garden. I’ll have to pass these tips on.
What a useful post. I wish we could have a garden! It looks so appealing and fun!
This is very helpful, I never thought about organizing leftover seeds this way. Thank you!
Clearly, I have a lot to learn. I would have never thought to have done this. I skipped having a garden last summer, but plan to resume it this summer. I will be coming back to your blog often for tips and help!
How exciting for you! Glad I can be of assistance, and let me know if you have any questions!
I wish I had the patience to garden. My husband does the landscaping and just asks for my opinion because I just can’t get into it! I applaud you for the passion and all of the information.
We all have our gifts 🙂 Thank you for reading and feel free to pass along to your husband!
I’ve always wanted to start my own garden in my backyard and this is great info for organization of the seeds. Thanks for the tips on what to do with the old seeds. Great article!
Unfortunately, my seeds get shoved in the pantry and forgotten about! This is great to get organized!
How have I lived without this guide?! The seed viability test is an awesome idea, thank you for sharing all of this!
Thank you for this great post! So informative. I love the tips on determining whether seeds are expired or not and what to do with old seeds you’re not going to use.
Great tips! I think I understand so at the end of the season you have seeds from what you have planted, you take those and save them for the following year and plant them again. Right?
Yes, that is seed saving. Most gardeners will also have seeds left in the seed packets that they didn’t plant as well. Therefore, organizing them is key to maintaining a good inventory and utilizing the oldest first. Thanks so much for reading & your question, Lisa!
omg you never cease to amaze me. if i ever get to a point where i get a yard and a garden again, this is my textbooks…
Glad to hear it, Jen! Why wait for a yard tho? Grab a few pots and start now 🙂
Hoping to restart gardening this coming spring! Great tips, I will surely use your organizing ideas. Thanks for sharing
How exciting for you, Lora! Glad you found this useful 🙂
So much great information! My wish is that one day I will be able to try my hand at gardening. I would love to be able to grow my own herbs and vegetables.
We always just kept our seeds in a drawer and then forget about them. I’ve not planted anything since my momma passed in 2006, but may need to get back in it. Thank you for sharing your tips.
Be sure to check out a new post coming this week, Seed Viability Testing, which includes a FREE Seed Viability chart as well as options for testing those older seeds for viability. Thanks for reading & joining the conversation!
Great tips! my seed packs are all over the place!
Thanks!
Good tips! I love gardening! Now I know what to do with old seeds too. Thanks!
Thanks for these tips! I’m going to save that Inventory tracker! I can’t wait to start my gardens 😀
So glad you found the info useful, Sydney. I’m with you, I cannot wait to get my hands dirty 🙂
Thanks for sharing! I would like plant a garden this year and have no idea where to start!
Hi Jill! Thanks so much for stopping by. Be sure to check out my Grow It Eat It garden, https://www.itsmysustainablelife.com/category/grow-it-eat-it/garden/, for many good tips & suggestions for beginners and feel free to reach out to me with any questions you may have!
OMG…thanks for the tip on checking to see if your seeds will bring you joy or disappointment. LOL. I have seeds from 2017-2018 and I am kicking myself that they are just sitting here…as I wonder if they are still good. I am creating some greenhouses today! 👩🌾🌱THANKS!
So glad I could be of inspiration! Be on the lookout this week for how to test your seeds for viability! Thanks so much for reading & joining the conversation!
I wish I had a yard to be able to plant in. These tips are great and easy to read.
That’s the beauty of gardening, you don’t need one. It can be done in pots outside or indoors in a sunny location! I’m glad you found them easy to understand and hope it inspires you to “grow your own” no matter the scale. Thank you for reading!
I am so guilty of not doing this but I know there are flowers that my daughter would love to grow in her new yard. Thanks for the reminder and I’ll definitely be referring to this post in the Fall. Great tips! Pinned
So glad you enjoyed it and it has inspired you a bit! Thank you so much for pinning as well 🙂
This is so neat. I am not in a place where I can have a garden but I love the organization and that fact that you have been doing it well for some time. Kudos to you. Purple thumb here!
Suzan, I am going to get my seeds organized this year! It is so wasteful to not harvest the seeds so I am going to be intentional this fall and save my seeds. Pinned.
Have a great week,
Kippi
Ps. I would like to link to this post with your permission.
How wonderful! I save selected seeds from my garden each year as well. Many thanks for pinning & look forward to your article linking mine 🙂
Thank you for all of this useful information. We just ordered our seeds for the year. We are finally starting the vegetable garden we have been talking about for the last 5 years!
How exciting, Erica! Nothing like growing your own 🙂 Glad you found this useful & look forward to hearing about your gardening endeavors!